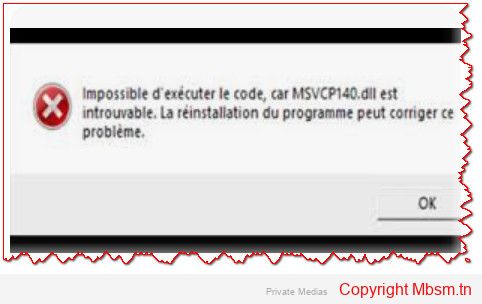
When you encounter an error message indicating that the vcruntime140d.dll file is missing or not found while running an application like appserv-x64-9.3.0, it usually means that the application depends on the Visual C++ Redistributable library that contains this file. In the case of the error mentioning vcruntime140d.dll, it indicates that the application is looking for a development-specific version of the library (the d in the filename denotes the debug/development version).
To resolve this issue, you can follow these steps:
1. Install the Visual C++ Redistributable Library
Most of the time, the application requires you to install the Microsoft Visual C++ Redistributable. You can download and install it from Microsoft’s official website:
Make sure to install the version that matches your system (64-bit or 32-bit).
2. Use the Correct Version of vcruntime140.dll
As mentioned, vcruntime140d.dll is the version meant for development. If you’re working in a production environment or on a machine that doesn’t have development tools like Visual Studio, you may need to use the regular version of vcruntime140.dll instead of the debug version.
You can search for the regular version (vcruntime140.dll) online and download it from trusted sources like Microsoft’s official website or trusted software distribution platforms.
3. Place the File in the Correct Folder
In the Same Folder as the Application: Place the vcruntime140.dll file in the same folder where the application throwing the error is located.
In the System Folder: You can also try placing the file in system folders like:
C:\Windows\System32 (for 64-bit systems)
C:\Windows\SysWOW64 (for 32-bit systems)
4. Restart the Computer
After installing the Visual C++ Redistributable or adding the file to the correct folder, restart your computer to ensure the changes take effect properly.
5. Check the Application Version
If you’re using a custom or beta version of the application (like appserv-x64-9.3.0), make sure it is compatible with the installed version of the Visual C++ libraries.
If the issue persists, you may need to install Visual Studio or development tools, which might include the missing file.
Mbsm.tn, Plugins wordpress 2024, Media Control Plugin: Full Control Over Media on Your WordPress Site, by Mbsmgroup
Category: Machine Learning
written by Mbsm.tn | 3 January، 2025
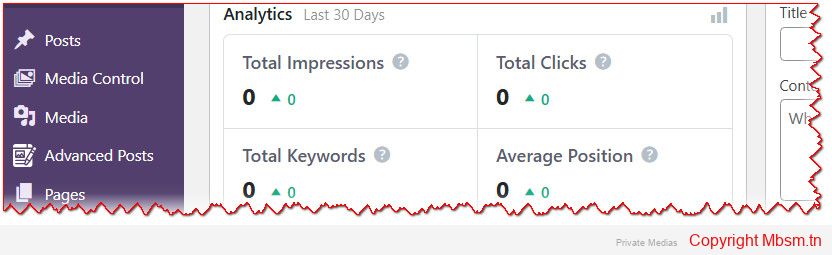
In today’s digital world, managing media files on a website is crucial for enhancing user experience and ensuring fast website performance. Among the available tools for website administrators, the Media Control plugin stands out as a powerful and effective solution for managing and displaying various media types on WordPress sites. This plugin is not just any ordinary tool; it is the result of meticulous development by Mbsmgroup, a team of skilled developers dedicated to providing a comprehensive tool that combines ease of use with high performance, while focusing on security and optimization.
Introduction to the Plugin
The Media Control plugin provides users with complete control over displaying various types of media, such as images, videos, audio files, PDFs, and ZIP files on their WordPress sites. The plugin is designed to be highly flexible, allowing customization of settings for displaying different media types, while offering pagination to manage a large number of files efficiently.
Key Features of the Plugin
Advanced Media Filtering: Users can filter the types of media they wish to display on their site. For example, they can choose to display only images or combine video and audio files in the same gallery.
Integrated Pagination: The plugin makes it easy for visitors to navigate through a large number of files by dividing the content into pages, helping improve website load time and enhancing the user experience.
Attractive Media Display: The plugin supports an organized and visually appealing display of media files that blends well with the overall design of the site. Media files like images, videos, and audios are displayed neatly with customizable templates.
Security and Filtering: A strong focus on security is evident in the plugin’s design. It automatically filters out file types that may pose security risks, such as PHP, CSS, and JS, ensuring the site remains safe from vulnerabilities.
Media Linked to Posts: Each media item is linked to the original post it belongs to, making it easy for visitors to navigate back to the post where the media is featured.
Security First: Ensuring Maximum Protection
One of the standout features of the Media Control plugin is its strong focus on security. In today’s online world, websites are constantly exposed to various security threats, especially when it comes to downloadable media files. The plugin is designed to ensure that only safe and legitimate files are displayed on the site. File types like PHP, CSS, and JS are explicitly excluded from being displayed, protecting the site from malicious code that could compromise its security.
The plugin only allows commonly used media files such as JPEG, PNG, GIF images, MP4, and MOV videos, and MP3 audio files to be shown, making sure that no harmful files are allowed to infiltrate the site.
Powerful Programming and Performance
Another major strength of the Media Control plugin is the advanced programming behind it, which follows best practices in WordPress development. The plugin is built using PHP and MySQL, ensuring fast and efficient performance even on websites with a large number of media files. The media files are loaded progressively (Lazy Load) with pagination support, minimizing memory consumption and improving page load speeds.
Additionally, the plugin is perfectly integrated with the WordPress ecosystem, ensuring that it can be added to any existing site without negatively impacting overall performance. It also supports the use of shortcodes, making it easy to embed media galleries anywhere on your site.
Continuous Development and Maintenance
The Media Control plugin is under continuous development by the team at Mbsmgroup, ensuring that it receives regular updates. These updates include performance improvements, new features, and compatibility with the latest versions of WordPress. The team is also responsive to user feedback, allowing for necessary tweaks to further improve the user experience.
Ease of Use and Customization
The Media Control plugin’s interface is simple to navigate, making it easy for anyone, regardless of technical expertise, to manage media files on their site. Through the plugin’s settings page in the WordPress dashboard, users can define how many media items to display per page and customize the types of files allowed.
Furthermore, the plugin provides shortcodes, which allow users to display media galleries anywhere on their site easily. This means you can quickly embed a gallery or display specific media files in any page or post on your website.
Conclusion
The Media Control plugin is an essential tool for anyone looking to manage media on their WordPress site effectively. With its advanced customization options, user-friendly interface, and focus on security, it offers the perfect solution for websites that need to display a large amount of media safely and efficiently.
Developed by Mbsmgroup, the plugin combines security with performance, making it one of the best choices available in the market. Whether you’re looking to enhance the management of media files on your site, improve security, or ensure faster load times, Media Control is the plugin you need.
Developer of the Plugin: The plugin was developed by Mbsmgroup, a team of experts with extensive experience in WordPress development, who continue to ensure the plugin is maintained and updated for optimal performance.
Media Control Plugin: Installation, Usage, and Shortcode Search Functionality
The Media Control plugin is a highly efficient tool designed to help WordPress users easily manage, display, and optimize media files on their websites. Whether you are dealing with a large volume of media or need a flexible solution for filtering and displaying files, this plugin offers powerful features with a focus on performance, security, and SEO optimization. In this article, we’ll walk you through the installation, usage, and effective utilization of the shortcode search functionality to make the most out of this plugin.
Installation of the Media Control Plugin
Installing the Media Control plugin is a simple and straightforward process. Just follow these steps:
Download the Plugin:
You can download the plugin either from the Here or directly from the developer’s website, Mbsmgroup.
Install via WordPress Dashboard:
Log in to your WordPress dashboard.
Go to Plugins > Add New.
Click on the Upload Plugin button at the top of the page.
Select the downloaded ZIP file and click on Install Now.
After installation, click on the Activate button to activate the plugin on your site.
Plugin Activated:
After activation, the plugin will create a new menu item called Media Control in the WordPress admin panel where you can configure and manage the plugin’s settings.
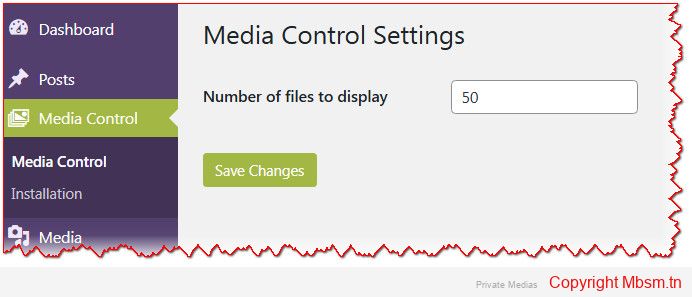
Configuring the Media Control Plugin
Once the plugin is installed and activated, you can configure it to fit your needs. Here’s how:
Navigate to the Settings:
Go to the Media Control menu in your WordPress admin dashboard.
Click on Media Control Settings.
Configure the Settings:
On the settings page, you will find options to define the number of media files to display per page.
You can also choose the types of media to be displayed, such as images, PDFs, videos, or audio files.
Make sure to configure these settings according to your preference and website needs.
Save Your Settings:
Once you’ve made your adjustments, click Save Changes to apply the new settings.
How to Use the Media Control Plugin
The Media Control plugin is designed to be user-friendly, and once installed, it integrates smoothly with your WordPress website. Here’s how you can use the plugin to display and manage your media:
Displaying Media with Pagination:
The plugin displays media in an organized and clean gallery. One of its standout features is the built-in pagination, which ensures faster load times by displaying a limited number of media items per page. This is particularly beneficial when you have a large number of media files on your site.
Access Media Information:
Each media item displayed is linked to its original post, making it easy for users to visit the post where the media was initially featured.
The plugin also offers previews for images, audio, and video files, along with downloadable links for files such as PDFs and ZIP files.
Filter Media by Type:
With the plugin, you can filter media by file type. You can choose to display images, audio, video, PDF, ZIP, or other media formats, offering greater flexibility and control over what content is shown.
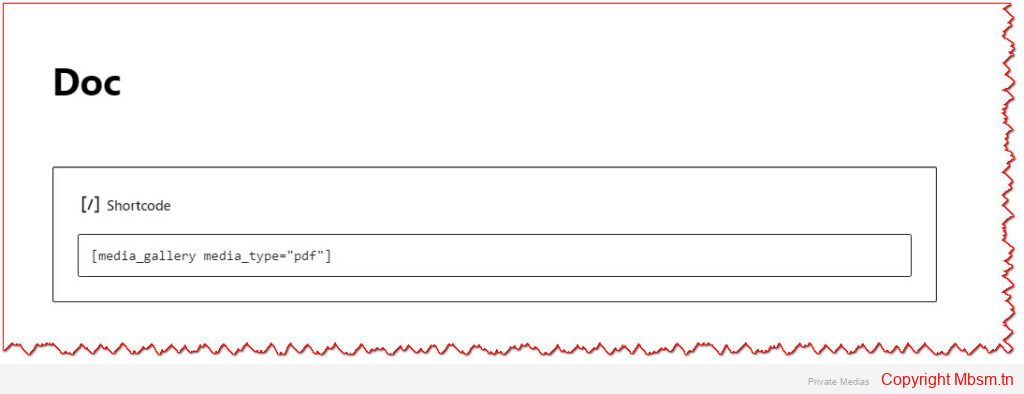
Shortcode for Displaying Media
One of the most powerful features of the Media Control plugin is its shortcode functionality. Shortcodes make it easy to insert media galleries anywhere on your WordPress site—whether in posts, pages, or widgets. You can define exactly what types of media you want to display and control how they appear on your site.
This parameter allows you to specify which types of media you want to display. You can specify multiple types by separating them with commas. For example, use "image, video" to display both images and videos.
Supported media types include: image, audio, video, pdf, zip.
media_count:
This parameter determines how many media files will be displayed per page. You can set a custom number to limit the number of files shown, optimizing your site’s load time and usability.
How to Use the Shortcode:
You can place this shortcode in any page, post, or widget to display a media gallery with the selected file types and pagination.
For example, if you want to display 10 images and videos on a page, add the following shortcode to your page content:
Once the shortcode is added, the plugin will display the media files according to the parameters you’ve defined.
Mbsm.tn, Tag Cloud Page Plugin for WordPress, Comprehensive Tag Search and Display by Mbsmgroup
Category: System Integration
written by Mbsm.tn | 3 January، 2025
The Tag Cloud Page plugin is a powerful WordPress tool that allows site owners to display all tags used across their site in one convenient page. This plugin not only organizes tags but also provides multiple search options, both within the site and across the web.
Key Features:
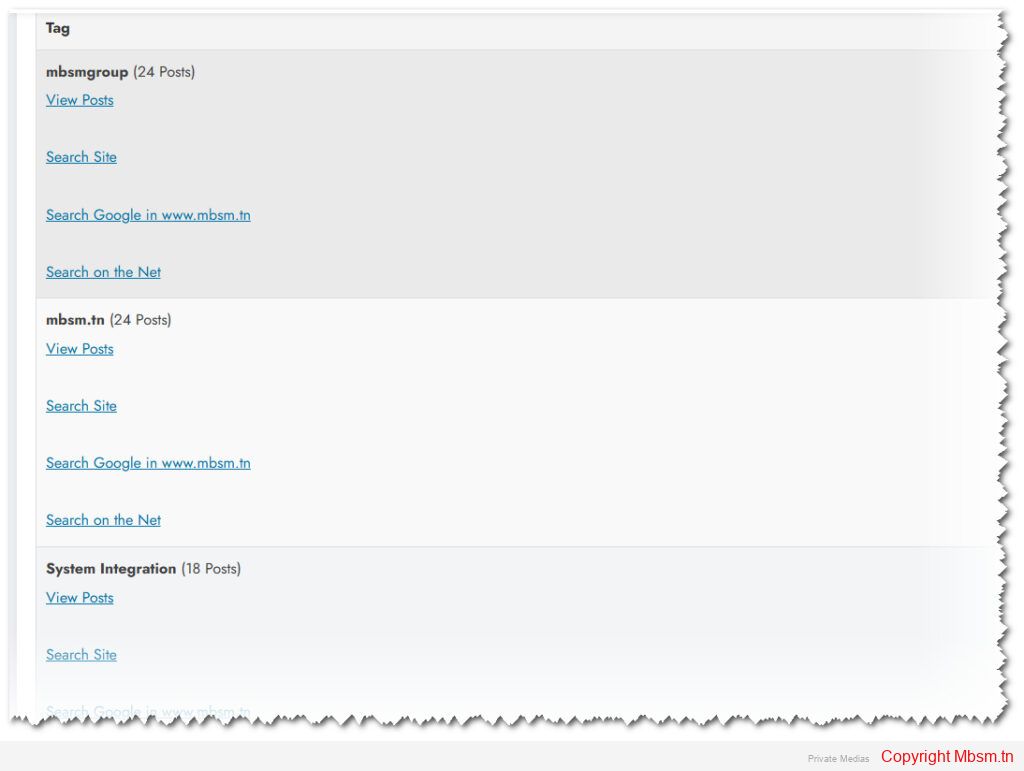
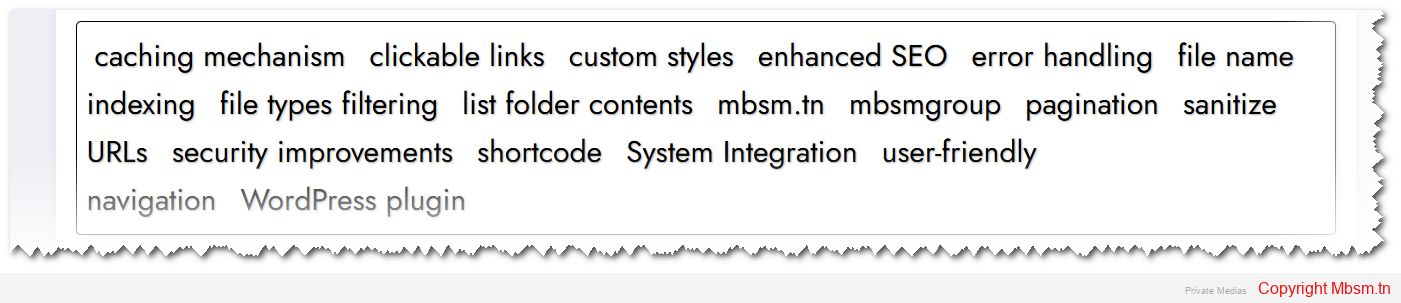
Comprehensive Tag Display Based on Usage: The plugin lists every tag used on the site, automatically sorting them by usage—either by the number of posts associated with each tag or alphabetically. This ensures that the most frequently used tags are displayed prominently.
Advanced Search Links for Each Tag: For every tag displayed, the plugin adds:
A link to view posts associated with that tag within your WordPress site.
A site-specific search link to search your site for all posts related to that tag.
An option to search Google for the tag, both across the web and restricted to your site, ensuring that visitors can easily explore relevant content using the tags.
Search Across the Site and the Web: The plugin offers enhanced functionality by allowing users to:
Search for posts on your WordPress site that use a particular tag.
Search the entire web for the tag using Google.
Search Google within your site for pages related to the tag, providing comprehensive results for deeper exploration.
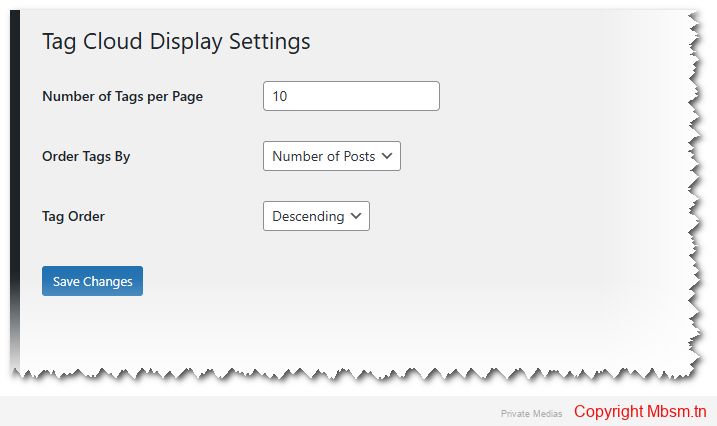
Pagination and Customization Options: The plugin supports pagination, making it easy to navigate through large sets of tags. You can also customize how many tags are shown per page and adjust the order of tags to suit your needs.
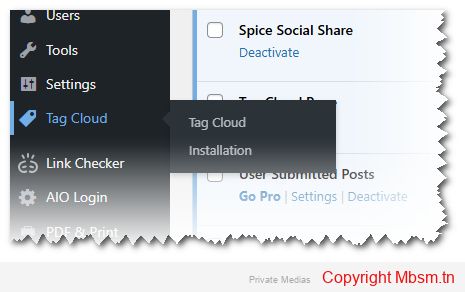
Activate the Plugin: Install and activate the plugin from your WordPress dashboard.
Page Creation: A page titled “All Tags” is automatically created, where you can view all your tags in one place.
Customize Settings: Navigate to the “Tag Cloud” settings in your WordPress admin menu to customize the display and search options.
Security and Reliability:
Developed by mbsmgroup, the Tag Cloud Page plugin adheres to strict WordPress security standards. It ensures that all data is securely handled using built-in WordPress functions like wp_insert_post and get_tags, preventing security vulnerabilities such as cross-site scripting (XSS).
The plugin has been tested extensively to ensure compatibility, safety, and stability, making it a reliable choice for any WordPress site.
Download Link:
You can download the Tag Cloud Page plugin here: Download Plugin.
Plugin Developer:
Created bymbsmgroup, a team dedicated to providing high-quality, secure WordPress solutions that improve site navigation and functionality.
Conclusion: The Tag Cloud Page plugin is perfect for WordPress site owners who want to showcase all their tags in one place, sorted by usage and offering multiple search options. Whether it’s searching within your site or across the web, this plugin ensures that both you and your users have quick access to all relevant content, improving site navigation and overall user experience.
Mbsm.tn, Plugins wordpress 2024, Each tag is linked to a site-wide search page, By mbsmgroup
Category: System Integration
written by Mbsm.tn | 3 January، 2025
Display Tags at the Beginning or End of Posts
Introduction:
The “Display Tags at the Beginning or End of Posts” plugin is a highly useful tool for WordPress users who want to improve user experience and boost content engagement on their websites. This plugin allows users to display the tags associated with each post either at the beginning or at the end of the post. It offers various customization options for styling, ensuring that users can personalize the display according to their needs.
What is the “Display Tags at the Beginning or End of Posts” Plugin?
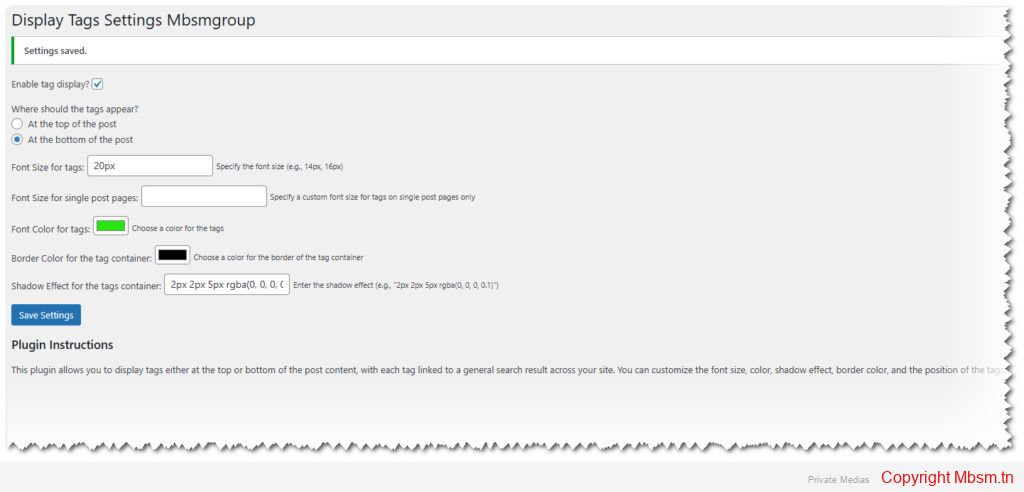
The “Display Tags at the Beginning or End of Posts” plugin is a tool that lets users display the tags associated with each post in a prominent and customizable way on their website. Users can choose whether to display the tags at the beginning or at the end of a post. They can also customize the tag’s text format, including font size, color, and shadow effects.
Additionally, the plugin automatically links the displayed tags to a site-wide search page. This means that when a user clicks on any tag, they are directed to a search results page showing all posts that share that tag. This feature allows visitors to easily explore related content, increasing engagement and time spent on the site.
Key Features of the Plugin:
Display Tags in a Specific Position:
The user can choose whether to display the tags at the beginning or at the end of the post, offering flexibility in content arrangement to match the website’s style.
Customization of Tag Appearance:
The plugin provides options for customizing font size, color, shadow effects, and the font size specifically for single posts (Single Posts), allowing for more control over the presentation.
Tag Search Links:
Each tag is linked to a site-wide search page. This feature ensures that when users click on any tag, they are taken to a search results page displaying all posts containing that same tag. This helps users easily discover other articles related to the same topic.
Full Control Over Appearance:
Through the plugin’s settings page in the WordPress dashboard, users can control options such as text color, font size, borders, and shadow effects for tags.
Multi-Language Support:
The plugin fully supports both Arabic and English, making it ideal for multi-language websites.
Ease of Customization:
The plugin can be easily customized through the settings page, making it suitable for even non-technical users.
Safe and SEO-Friendly:
This plugin is developed with security and SEO in mind. It follows best practices to ensure that it does not conflict with other plugins or slow down your website. The display of tags is structured in a way that is friendly to search engines, improving the chances of your site ranking higher in search results.
How to Use the Plugin?
Using the plugin is simple and user-friendly. After installing and activating it, users can access its settings from the WordPress dashboard. From here, they can choose whether to display the tags at the beginning or at the end of the post. Users can also customize the font size, color, borders, and shadow effects for the tags.
Once the settings are saved, the tags will automatically appear in the posts according to the user’s preferences. Additionally, when users click on any tag, they are redirected to a search results page that shows all posts with that specific tag.
Plugin Developer:
This plugin was developed by [Mbsmgroup], a skilled developer with extensive experience in creating WordPress plugins. Users who wish to get in touch with the developer or request further customizations can visit their profile page through the following link:
This plugin offers many opportunities for further development, and developers can add additional features based on their needs. Some potential enhancements include:
Adding More Customization Options:
For example, adding animated effects to the tags when hovering over them.
Integration with Other Plugins:
The plugin can be integrated with other WordPress plugins like SEO tools or performance optimization tools.
Advanced Customization:
By modifying the plugin’s code, developers can add more specific display options, such as changing the tag layout or adding new effects.
Translation to Additional Languages:
The plugin can be developed to support more languages, enhancing its usability for multi-language sites.
Download the Plugin:
If you would like to download the plugin, you can visit the following link:
This plugin is designed with both security and SEO in mind. It follows best practices to ensure that it doesn’t create conflicts with other plugins or affect website performance. The tag display is structured in a way that search engines can easily index, helping to boost SEO. By linking tags to search results, this feature improves the chances of your content being discovered by a wider audience.
You can check the plugin’s security and performance status by visiting the link below for a detailed scan:
Mbsm.tn, Plugins wordpress 2024, Add Links to all Images Automatic in Single Posts Plugin by MBSMGROUP
Category: Machine Learning
written by Mbsm.tn | 3 January، 2025
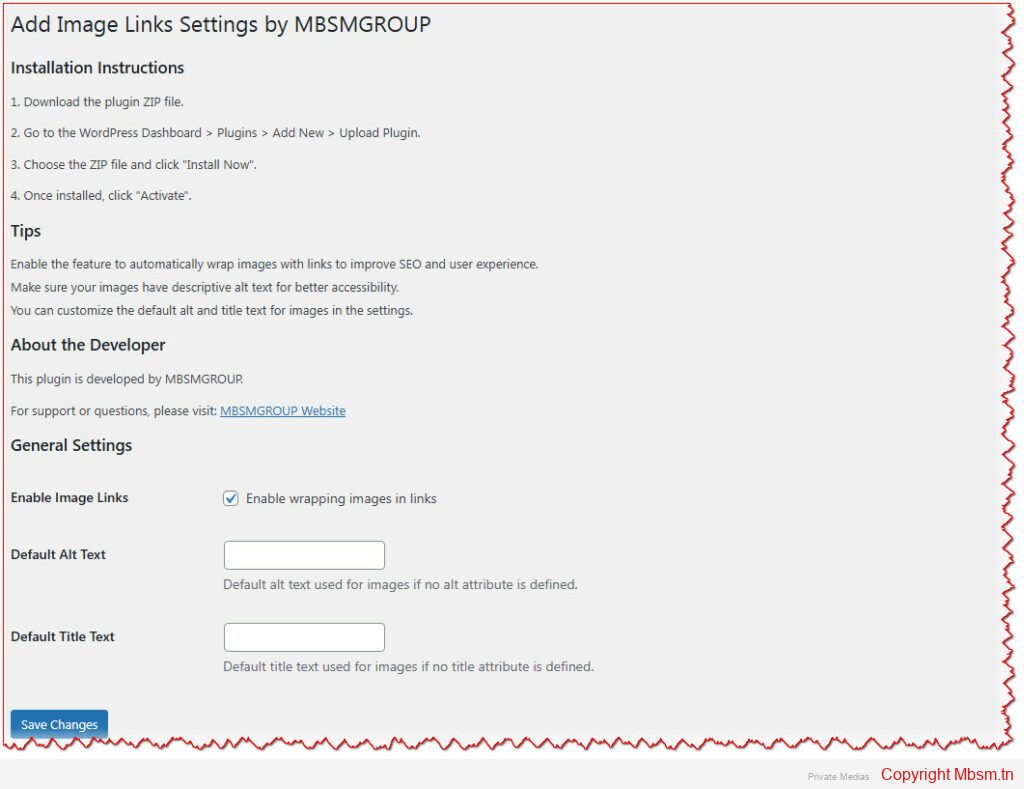
Add Links to Images in Single Posts Plugin by MBSMGROUP
The “Add Links to Images in Single Posts” plugin is a simple yet powerful tool designed to enhance the way images are presented and interactable on your WordPress website. This plugin automatically wraps all images in single posts with a clickable link that points to the image URL. Additionally, it uses the post title for the alt and title attributes of images, improving both SEO (Search Engine Optimization) and accessibility.
Key Features of the Plugin
Automatic Linking for Images:
The plugin automatically converts all images in your single blog posts into clickable links, making the images more interactive and improving the user experience.
Each image is wrapped in a link pointing to the image’s URL, allowing users to click on an image to view it in its original size.
SEO and Accessibility Benefits:
By adding the post title as the alt and title attributes to the images, the plugin improves SEO rankings and enhances accessibility.
Search engines use the alt attribute to understand the content of an image, which can help your site rank higher in search results.
The title attribute helps screen readers provide context to visually impaired users, making the website more accessible.
Customizable Settings:
Enable/Disable Image Linking: The plugin provides an option to enable or disable the automatic linking of images.
Custom Alt and Title Text: You can customize the default alt and title text that is applied to the images, or leave them as the post title to make the images more descriptive.
Easy Installation:
The plugin is straightforward to install and configure. Simply upload the plugin ZIP file to your WordPress dashboard, activate it, and the plugin will work automatically on all single posts.
Developer-Friendly:
Built with best practices in mind, the plugin offers flexibility for developers who want to extend its functionality. It is fully compatible with WordPress’s coding standards and is easy to integrate with other plugins or custom themes.
How to Install the Plugin
Download the plugin ZIP file from the WordPress repository or the plugin’s website.
Go to your WordPress dashboard and navigate to Plugins > Add New.
Click on Upload Plugin, choose the downloaded ZIP file, and click Install Now.
After installation, click on Activate to enable the plugin on your site.
Once activated, go to Settings > Add Image Links to customize the plugin’s settings to suit your needs.
Tips for Using the Plugin
Enable Image Linking: For better SEO and user experience, it’s recommended to enable the feature that wraps images with links. This will not only improve accessibility but also boost engagement by making your images clickable.
Customize Alt and Title Attributes: You can adjust the default alt and title text in the plugin settings to make your images more descriptive and useful for SEO.
Use Descriptive Titles: Always make sure your images have meaningful alt text, which helps both search engines and users understand what the image represents, especially for users with visual impairments.
About the Developer
This plugin is developed by MBSMGROUP, a leading provider of WordPress solutions. MBSMGROUP focuses on creating high-quality, user-friendly plugins that help webmasters and developers enhance their websites’ functionality.
For more information about the developer or to get support for the plugin, you can visit MBSMGROUP’s official website.
Conclusion
The “Add Links to Images in Single Posts” plugin is a great tool for anyone who wants to make their images more interactive and accessible. With easy installation, customizable settings, and SEO benefits, this plugin can significantly improve your website’s user experience and visibility in search engines. Whether you are a blogger, content creator, or website owner, this plugin is a valuable addition to your WordPress toolkit.
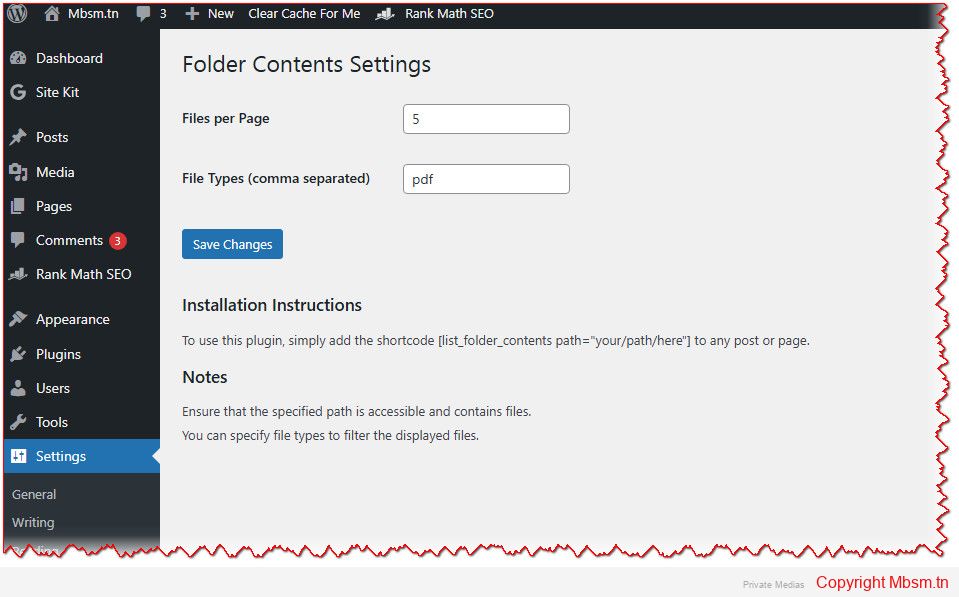
Mbsm.tn, Plugins wordpress 2024, List Folder Contents with Enhanced SEO, with pagination , Programmation Mbsmgroup
Category: System Integration
written by Mbsm.tn | 3 January، 2025
WordPress plugin that lists the contents of a specific folder on the server and displays them in a single-column list. The contents are displayed with clickable links, and each link also includes searchable word links for the filename split into individual words. Additionally, the plugin includes improvements for SEO and styling, including pagination.
Here’s a breakdown of what the code does:
Main Features:
Shortcode for Listing Folder Contents:
The function list_folder_contents_shortcode takes a folder path as an attribute and generates a list of files within that folder.
It checks for invalid or inaccessible folder paths.
It allows filtering by file type, if specified in the plugin settings (lfc_file_types option).
It paginates the list of files to avoid loading too many files at once, based on the lfc_files_per_page option.
Each item in the list is clickable and links to a URL corresponding to that file.
SEO Improvements:
The plugin splits the filenames into words and creates links for each word. This helps search engines index the individual words in the filenames, potentially improving SEO.
It uses title and alt attributes for SEO, making sure that the file names and their related words are indexed properly.
Security Improvements:
The target="_blank" attribute is used for opening links in a new tab, along with rel="noopener noreferrer" to improve security when opening external links.
URLs are sanitized using esc_url(), and file names are sanitized using esc_html() and esc_attr().
Styling:
Custom styles are added to the list of folder contents and pagination. The wp_head action hook is used to inject CSS directly into the head of the page.
Pagination controls are styled to ensure they are user-friendly and visually consistent.
Notes:
Folder Path:
The folder path is relative to the WordPress installation directory (ABSPATH). The plugin ensures that the path is valid and accessible. If the path is invalid or not a directory, it returns an error message.
Pagination:
The pagination is based on the paged query variable and the lfc_files_per_page option. This ensures that large directories are displayed over multiple pages rather than all at once.
File Type Filtering:
The plugin can filter files based on specific extensions. These extensions are specified by the user in the plugin settings under lfc_file_types. The plugin splits the string by commas and filters files accordingly.
Possible Improvements or Considerations:
Security: The plugin checks for the validity of the folder path, but depending on where it’s used, you may want to further restrict access to specific directories to avoid potential misuse or unauthorized access to sensitive files.
Error Handling: The plugin currently returns a simple error message if the folder is invalid or inaccessible. You could enhance this by adding logging or more detailed error handling for debugging purposes.
Caching: If the folder contents do not change frequently, you may want to add a caching mechanism to speed up performance, especially if the plugin is used on a site with large directories.
Customization: You might want to allow users to customize the appearance further by adding more style options or enabling a custom CSS file.
Overall Summary:
This plugin provides a useful way to display folder contents in WordPress with SEO enhancements and simple pagination. The implementation is solid, and it’s easily extensible for further customization or improvement if necessary.
Installation Instructions
To use this plugin, simply add the shortcode [list_folder_contents path=”your/path/here”] to any post or page.
Notes
Ensure that the specified path is accessible and contains files.
You can specify file types to filter the displayed files.
Mbsm.tn, Understanding Low Pressure and High Pressure in Refrigeration Systems
Category: Machine Learning
written by Mbsm.tn | 3 January، 2025
Understanding Low Pressure and High Pressure in Refrigeration Systems
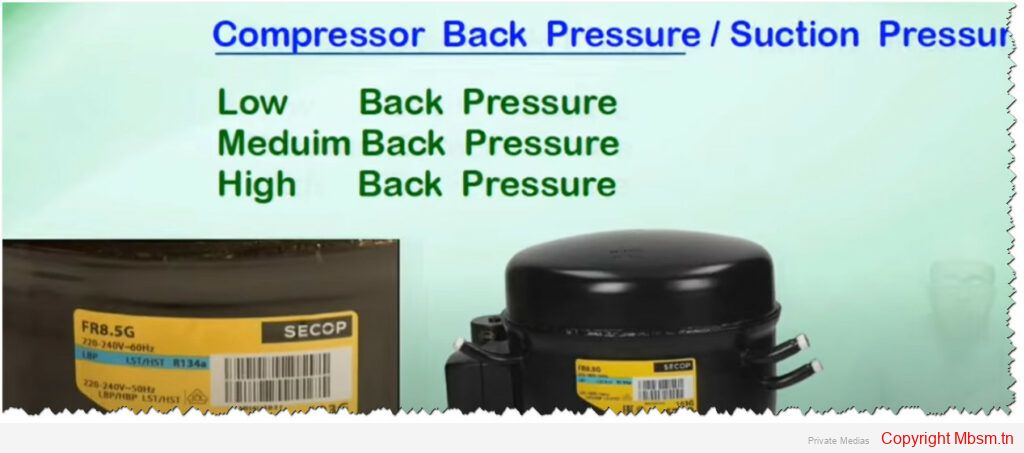
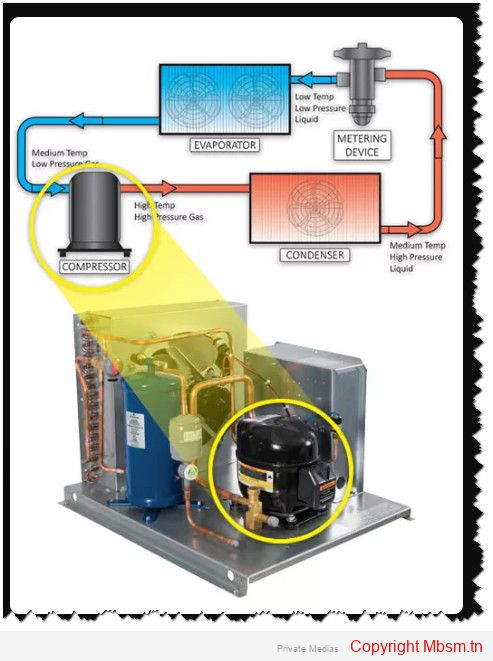
Refrigeration systems operate on the principles of thermodynamics, utilizing refrigerants that change states between liquid and gas to absorb and release heat. The system is characterized by two distinct pressure zones: low pressure (or evaporating pressure) and high pressure (or condensing pressure). Understanding these pressures is crucial for the efficient operation of refrigeration systems.
Low Pressure (Evaporating Pressure)
The low-pressure side of a refrigeration system includes components such as the evaporator and the suction line leading to the compressor. Here, the refrigerant exists primarily as a low-pressure gas. The key processes involved are:
Evaporation: The refrigerant absorbs heat from the environment (e.g., from inside a refrigerator) and evaporates, transitioning from a liquid to a gas. This process occurs at low pressure, which allows the refrigerant to absorb heat effectively at lower temperatures12.
Pressure Measurement: The evaporating pressure can be measured using a gauge placed between the metering device outlet and the compressor. Accurate readings are essential for diagnosing system performance1.
The evaporating pressure is critical because it dictates how effectively the refrigerant can absorb heat. As pressure decreases, the saturation temperature also decreases, allowing for cooling at lower temperatures
The high-pressure side encompasses components such as the compressor discharge, condenser, and discharge line. The processes here include:
Compression: The compressor takes in low-pressure gas from the evaporator and compresses it into a high-pressure gas. This compression increases both the pressure and temperature of the refrigerant, preparing it for heat rejection in the condenser24.
Condensation: In the condenser, the high-pressure gas releases its heat to the external environment and condenses back into a liquid state. This phase change occurs at high pressure, which is necessary for effective heat transfer15.
The condensing pressure is measured anywhere between the compressor’s discharge valve and the entrance to the metering device. Proper monitoring ensures that the system operates within safe limits to prevent failures or leaks
3.
Key Differences Between Low and High Pressure
Feature
Low Pressure (Evaporating)
High Pressure (Condensing)
State of Refrigerant
Primarily vapor
Primarily liquid
Function
Absorbs heat
Releases heat
Measurement Location
Between metering device and compressor
Between compressor discharge and metering device
Pressure Range
Typically lower than atmospheric
Higher than atmospheric
Temperature Relation
Lower saturation temperature
Higher saturation temperature
Importance of Pressure Control
Maintaining appropriate pressure levels is vital for safe and efficient operation. Excessive pressures can lead to equipment failure or catastrophic events like refrigerant leaks or explosions
3. Therefore, components such as expansion valves or capillary tubes play critical roles in regulating these pressures by creating resistance to fluid flow, ensuring that refrigerants transition smoothly between high and low pressures throughout their cycle56.In summary, understanding low and high pressures in refrigeration systems is essential for their effective operation. These pressures dictate how refrigerants absorb and release heat, ultimately determining the efficiency of cooling systems.
Mbsm.tn, The Impact of Temperature Control on Compressor Performance in Refrigeration Systems
Category: Machine Learning
written by Mbsm.tn | 3 January، 2025
Overview of Temperature Control in Refrigeration Systems
Temperature control plays a crucial role in the performance and efficiency of refrigeration systems, particularly in relation to compressor operation. The compressor is a vital component that significantly influences the overall energy consumption and effectiveness of the refrigeration cycle. Understanding how temperature affects compressor performance can lead to improved energy efficiency and system reliability.
Key Factors Influencing Compressor Performance
1. Coefficient of Performance (CoP) The Coefficient of Performance (CoP) is a primary measure of the efficiency of refrigeration systems, defined as the ratio of useful cooling provided to the work input by the compressor. A higher CoP indicates better energy efficiency. The CoP is influenced by two main temperatures: the evaporating temperature (TeTe) and the condensing temperature (TcTc). Specifically, an increase in TeTe or a decrease in TcTc enhances the CoP, with each 1°C change in these temperatures resulting in a 2-4% variation in energy use for constant cooling output
1.2. Operating Pressures Operating pressures are closely linked to temperature control. Higher operating pressures improve heat transfer rates, which enhances overall system efficiency and reduces energy consumption. Conversely, low operating pressures can lead to increased energy usage as the compressor must work harder to achieve desired cooling effects3. This relationship underscores the importance of maintaining optimal pressure levels for effective temperature control.3. Variable Speed Compressors The implementation of variable speed compressors allows for dynamic adjustment based on cooling demands. This adaptability helps maintain optimal performance across varying load conditions, thus improving CoP at partial loads12. For instance, reducing compressor speed can lead to significant energy savings while still meeting cooling requirements2.
Strategies for Effective Temperature Control
1. Adjusting Evaporating and Condensing Temperatures Practical measures to optimize TeTe and TcTc include:
Improving evaporator performance: This can be achieved by ensuring proper sizing and minimizing fouling.
Controlling condensing temperatures: Avoiding excessive head pressure control can enhance system efficiency by allowing lower condensing temperatures when conditions permit1.
2. Enhanced Control Systems Advanced control strategies that monitor parameters such as two-phase length and superheat temperature can optimize compressor operation. These systems can dynamically adjust compressor speed to maintain desired cooling capacities while maximizing efficiency
2.3. Regular Maintenance Regular maintenance of refrigeration systems is essential to ensure that all components, including compressors, operate efficiently under varying temperatures. This includes cleaning heat exchangers and ensuring that expansion valves are properly set to minimize superheating1.
Conclusion
Temperature control is integral to optimizing compressor performance in refrigeration systems. By understanding the relationships between evaporating and condensing temperatures, operating pressures, and compressor dynamics, significant improvements in energy efficiency can be achieved. Implementing advanced controls and maintaining optimal operating conditions are essential strategies for enhancing the overall performance of refrigeration systems.
Mbsm.pro, Energy Efficiency in Refrigeration: How to Optimize Your Cooling Systems
Category: Machine Learning
written by Mbsm.tn | 3 January، 2025
Energy efficiency in refrigeration systems is crucial for reducing operational costs and minimizing environmental impact. Here are several strategies to optimize cooling systems effectively:
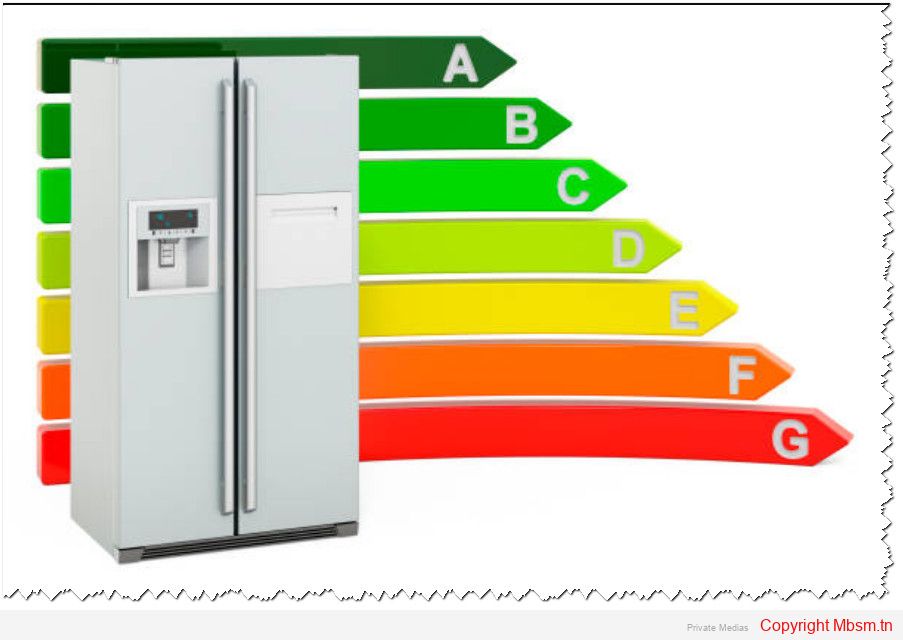
1. Upgrade to Energy-Efficient Models
Investing in modern, energy-efficient refrigeration units can lead to significant savings. Look for models with high Energy Star ratings, as these indicate superior energy performance compared to older units12.
2. Regular Maintenance and Cleaning
Routine maintenance is essential for optimal performance. Regularly clean and inspect components such as coils, fans, and filters to prevent reduced airflow and increased energy consumption24. Neglecting maintenance can result in higher operational costs and decreased efficiency.
3. Improve Insulation
Effective insulation is vital for maintaining desired temperatures and preventing energy loss. Ensure that doors, seals, and insulation materials are in good condition. Upgrading to high-quality insulation can significantly enhance energy efficiency by reducing the workload on refrigeration systems12.
4. Optimize System Design
The design of a refrigeration system should be tailored to the specific needs of the business, including size, layout, and cooling requirements. Proper component selection and effective layout planning contribute to improved performance and reduced energy consumption14.
5. Enhance Airflow and Ventilation
Proper positioning of refrigeration units is critical. Ensure they are located in well-ventilated areas away from heat sources like ovens or direct sunlight. Clear airflow pathways around the units to prevent overheating and excessive energy use24.
6. Manage Temperature Setpoints
Setting appropriate temperature levels based on the specific requirements of stored products can greatly improve efficiency. Avoid setting temperatures lower than necessary, as this can lead to excessive energy use12.
7. Limit Door Openings
Frequent door openings allow warm air to enter refrigerated spaces, increasing the workload on cooling systems. Train staff to minimize door openings and organize storage efficiently to reduce the time doors are open24.
8. Utilize Advanced Technologies
Incorporate advanced technologies such as smart controls, energy-efficient compressors, and LED lighting. These innovations can enhance the performance of refrigeration systems while reducing energy consumption12.
9. Implement Heat Recovery Systems
Consider using heat recovery systems that capture waste heat generated by refrigeration processes for other purposes, such as water heating or space heating. This approach not only reduces overall energy consumption but also improves system efficiency24.
10. Monitor Performance Regularly
Continuous monitoring of refrigeration system performance helps identify inefficiencies and areas for improvement. Implementing control systems that optimize operation under varying conditions can lead to better energy management56.By applying these strategies, businesses can significantly enhance the energy efficiency of their refrigeration systems, leading to lower costs and a reduced environmental footprint.
Mbsm.tn, Freezing Techniques in Commercial Refrigeration: Best Practices and Tips
Category: Machine Learning
written by Mbsm.tn | 3 January، 2025
In the food industry, effective freezing techniques are essential for preserving product quality, safety, and nutritional value. Various methods are employed in commercial refrigeration to achieve optimal freezing results. Here’s an overview of the best practices and tips for freezing techniques.
Common Freezing Methods
Blast Freezing
Description: This method involves circulating cold air over food products to rapidly remove heat. Cold air is blown from one end of the chamber while warm air is sucked from the other, passing through cooling coils that contain refrigerants15.
Advantages: Economical and effective for large batches of food; modern upgrades have led to quicker freezing times with technologies like Individual Quick Freezing (IQF)13.
Disadvantages: Slower than some advanced methods, leading to potential quality loss due to prolonged exposure to varying temperatures1.
Cryogenic Freezing
Description: Utilizes liquid nitrogen or carbon dioxide to freeze products at extremely low temperatures (around -90°C) almost instantaneously18.
Advantages: Rapid freezing minimizes ice crystal formation, preserving texture and flavor. Ideal for high-quality products such as seafood38.
Disadvantages: Higher operational costs compared to traditional methods.
Contact Freezing
Description: Involves placing food in direct contact with cold surfaces or plates, often using water as a freezing medium1.
Advantages: Efficient for bulk products and minimizes oxidation and dehydration1.
Disadvantages: Requires thawing of entire blocks even if only a portion is needed, which can compromise quality upon refreezing1.
Best Practices for Effective Freezing
Rapid Freezing: Freeze food as quickly as possible after preparation to maintain freshness and minimize ice crystal formation. Ideally, food should not sit at room temperature for more than two hours before freezing9.
Temperature Control: Ensure that freezers operate at safe temperatures (below -18°C) to effectively halt microbial growth and preserve food quality. Regularly check and calibrate thermostats69.
Airflow Optimization: Maintain proper airflow within freezers by avoiding obstructions near evaporators. This ensures efficient cooling and uniform freezing rates across all products25.
Proper Storage Techniques:
Keep freezers well-stocked to maintain thermal mass, which helps stabilize temperatures during door openings.
Organize food items to prevent cross-contamination and facilitate airflow around products49.
Regular Maintenance: Conduct routine inspections of refrigeration systems, including cleaning condenser coils and checking refrigerant levels. Address any issues promptly to prevent breakdowns and ensure consistent performance6.
Conclusion
Implementing these freezing techniques and best practices in commercial refrigeration can significantly enhance food preservation efforts. By choosing the right freezing method, maintaining optimal conditions, and ensuring regular maintenance, businesses can deliver high-quality products while minimizing waste and maximizing efficiency.